- Views: 4.1K
- Category: AWS
- Published at: 20 Mar, 2020
- Updated at: 18 Aug, 2023
How to install Lets Encrypt SSL certificate on your AWS Lightsail instance
How to install the Lets Encrypt SSL certificate on your AWS Lightsail
The first question that comes to our mind is what is an SSL certificate, and why do we use it..? The answer is straightforward, you must have the SSL certificate if you are running your website because of its Google recommendation. If you want to show your web pages on Google's first page, you have integrated the SSL certificate to achieve the goal.
Installing an SSL certificate on your AWS instance is very hard, especially if you are not a technical person/programmer; you have shared hosting. Your hosting provider can install the SSL certificate for you out of the box. A most person has an AWS account, and they use always manage their lightsail instance.
How to install the Let's Encrypt SSL certificate on your AWS Lightsail instance..? this is the question people always ask, so today, we will install the Let's Encrypt SSL certificate for your Lightsail instance. Follow the steps to integrate the SSL certificate for your AWS Lightsail instance.
Step 1: Before installing the SSL certificate on your Lightsail instance you have created the Lightsail instance.
Once you create the instance you have to purchase a domain to assign the instance to the purchased domain and finally download the putty if you want to access your server otherwise, ignore this one.
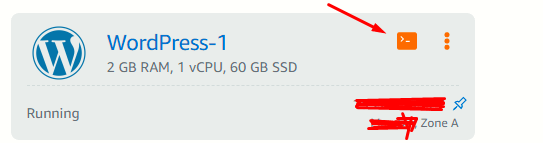
Step 2: Open your SSH terminal to install the Certbot for your Lightsail instance. Once you open your ssh terminal, just this code
sudo apt-get update
to update your package.
Step 3: For the software properties package to install on your instance use this code
sudo apt-get install software-properties-common
Step 4: Use the following code to add Certbot to the apt repository
sudo apt-add-repository ppa:certbot/certbot –y
Step 5: Use the code to update the apt so that you can include the new repository
sudo apt-get update –y
Step 6: Use the code to install the Certbot
sudo apt-get install certbot -y
So now, you have successfully installed the Certbot on your Lightsail instance.
Step 7: Keep your SSH terminal open, So now you have to request a Let's Encrypt SSL Certificate.
DOMAIN=yourDomain.com
WILDCARD=*.$DOMAIN
Step 8: Use the code to view or confirm the domain you have entered
echo $DOMAIN && echo $WILDCARD
Step 9: Use the code to start Certbot (interactive mode), Which means you are saying to the Certbot to use the manual authorization and verify the domain ownership
sudo certbot -d $DOMAIN -d $WILDCARD --manual --preferred-challenges dns certonly
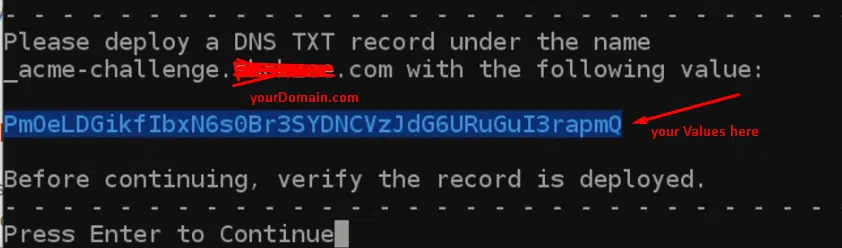
once you enter the code, it will ask for your email address; provide it and hit the enter button, and you can also read the terms and conditions.
Step 10: Now you have the TXT record with value, copy the TXT record and values, i.e., _acme-challenge.yourDomain.com, and the value is CvKHWLeioiz5BBU; make sure to keep the SSH window open.
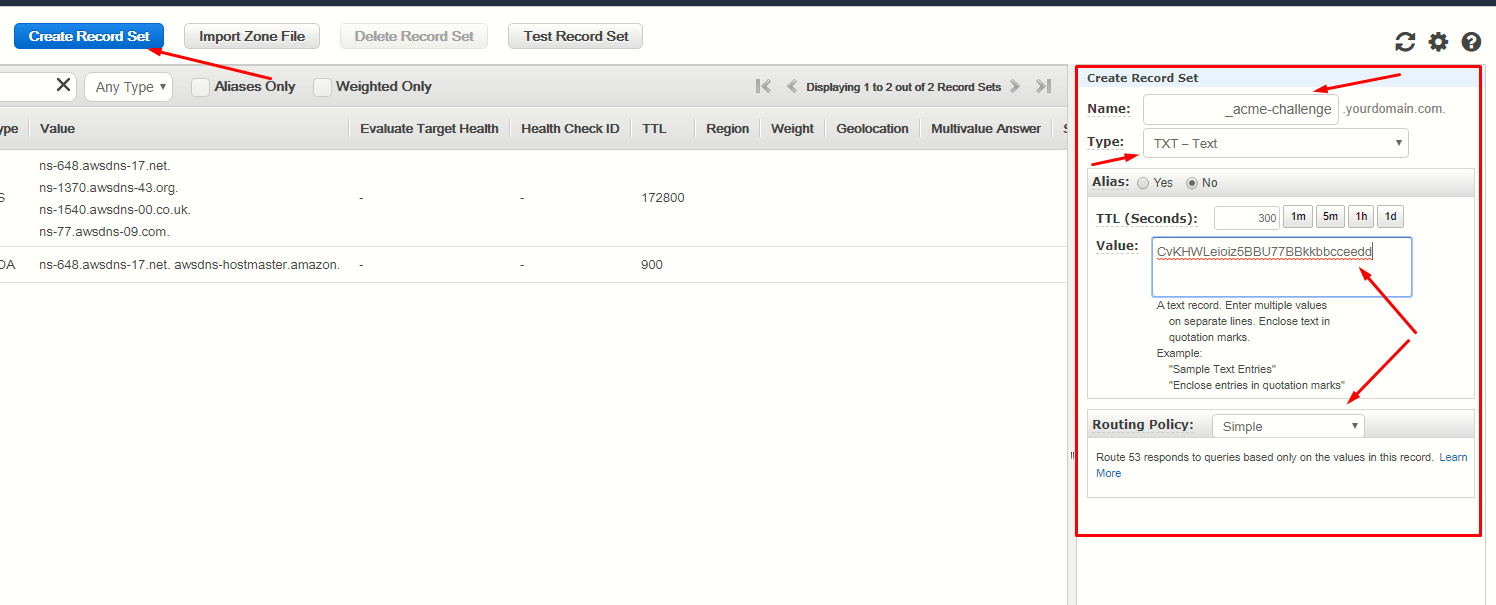
Step 11: So now go to the DNS setting, i.e., if you purchased the domain for GoDaddy for other domain providers, add your TXT record with values that you have copied/saved _acme-challenge.yourDomain.com, and the value of is CvKHWLeioiz5BBU make sure select the TXT record.
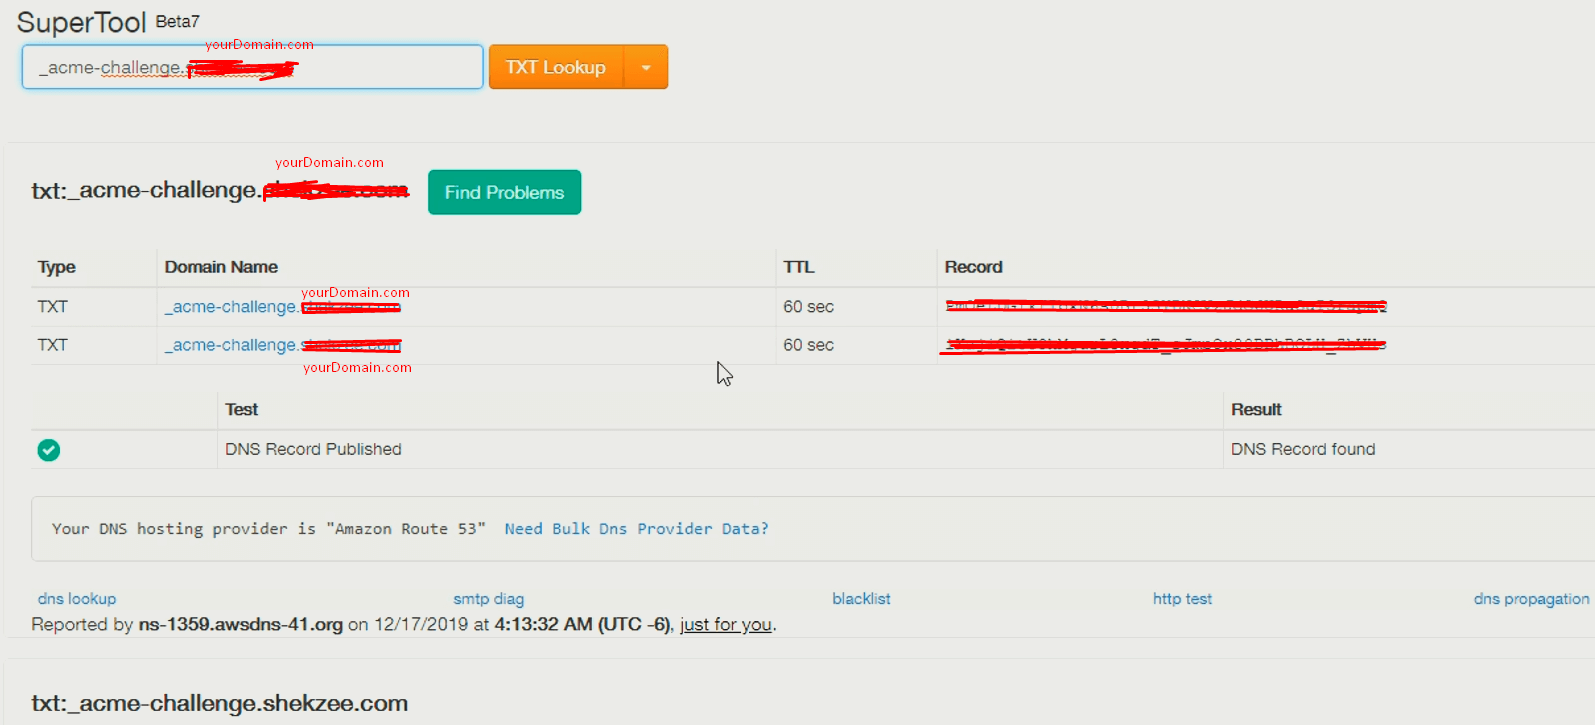
Step 12: Now that you have confirmed that your TXT record has correctly propagated, go to the mxtoolbox and add the _acme-challenge.yourDomain.com, and hit the TXT Lookup button; it will show your TXT record. Repeat the same 11 and 12 steps for the second TXT record, and hit the enter button from your SSH panel.
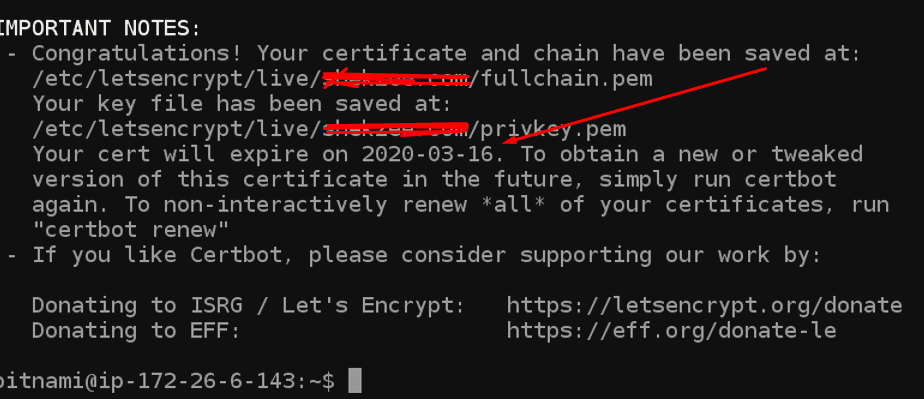
Wait for a few seconds; lects encrypt to verify your SSL certificate. Once it's done, they will show you the expiration date with a congratulatory message on your SSH terminal.
Keep your expiry date so you can further renew your certificate.
This is your Confirmation message.
Step 13: Now, link your Let's Encrypt Certbot with our Apache servers files/directory. Use this code to link.
sudo /opt/bitnami/ctlscript.sh stop
Step 14: Now you have set the environment variable
DOMAIN=yourDomain.com
Step 15: Check your domain name
echo $DOMAIN
Step 16: Use the following code individually.
 sudo mv /opt/bitnami/apache2/conf/server.crt /opt/bitnami/apache2/conf/server.crt.old
 sudo mv /opt/bitnami/apache2/conf/server.key /opt/bitnami/apache2/conf/server.key.old
 sudo mv /opt/bitnami/apache2/conf/server.csr /opt/bitnami/apache2/conf/server.csr.old
Step 17: Use the following code to create the links with your certificate (apache directory).
sudo ln -s /etc/letsencrypt/live/$DOMAIN/privkey.pem /opt/bitnami/apache2/conf/server.key
sudo ln -s /etc/letsencrypt/live/$DOMAIN/fullchain.pem /opt/bitnami/apache2/conf/server.crt
Step 18: Now its time to restart your services
sudo /opt/bitnami/ctlscript.sh start
Congratulation, you have successfully installed the SSL certificate for your Amazone Lightsail instance.
https://www.youtube.com/watch?v=QWBH9RF363w&t=
Related Blogs
How to access phpmyadmin using putty for wordpress lightsail
How to access PHPMyAdmin using Putty for wordpress lightsail If you are new to amazon l...
How to launch WordPress website on amazon lightsail
How to launch a WordPress website on amazon lightsail Millions of websites are hosted on shared h...

0 Comment(s)